Leading a Wakatime Leaderboard using a $2 microcontroller and < 50 lines of code.

Overview.
This article is a step-by-step walkthrough of how to use digispark, an Attiny85 based microcontroller development board, to mimic a human interface device. To better illustrate the digispark’s capabilities as a human interface device we will use it to “write code on our behalf” and track how long the microcontroller has been writing code it using Wakatime.
Disclaimer : I am not doing this to shame/embarrass any company and/or individual. I am doing this purely for research and fun.
Introduction.

What is Digispark?
The Digispark is an Attiny85 based microcontroller development board similar to the Arduino line, only cheaper, smaller, and a bit less powerful. With a whole host of shields to extend its functionality and the ability to use the familiar Arduino IDE, the Digispark is a great way to jump into electronics, or perfect for when an Arduino is too big or too much. ~ http://digistump.com/products/1
A digispark can be used for projects ranging from simple LED flashing, to elaborate sensor projects. If a project can be done with an Arduino it can probably be done with a digispark.
In our case we will be using it to as human interface device specifically as a keyboard.
Wakatime HID Sample Project.
For this project we will be using:
Step 1: Setting up Wakatime.
To better understand wakatime, watch this video by @DavideBenvegnu
Step 2: Install vim wakatime plugin.
- Install Pathogen for Vim.
- From terminal run:
- cd ~/.vim/bundle && git clone git://github.com/wakatime/vim-wakatime.git
- (Re-)start Vim and enter your API Key, then press Enter.
- Type some code, then visit your WakaTime Dashboard to see your stats!
Step 3: Install Arduino IDE.
Installing arduino ide is fairly simple and straightforward. You can use this tutorial https://www.circuitbasics.com/arduino-basics-installing-software/
Step 4: Installing digispark libraries on Arduino IDE
a. Run the Arduino application.
b. In the Arduino application go to the “File” menu and select “Preferences”
c. In the box labeled “Additional Boards Manager URLs” enter:
http://digistump.com/package_digistump_index.json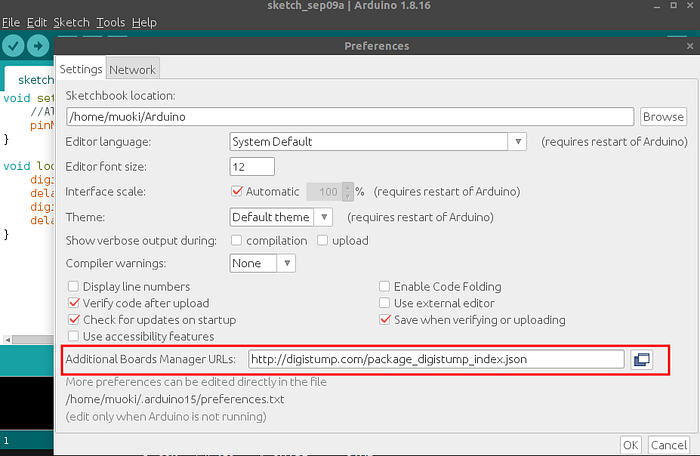
d. Go to the “Tools” menu and then the “Board” submenu — select “Boards Manager” and then from the type drop down select “Contributed”:
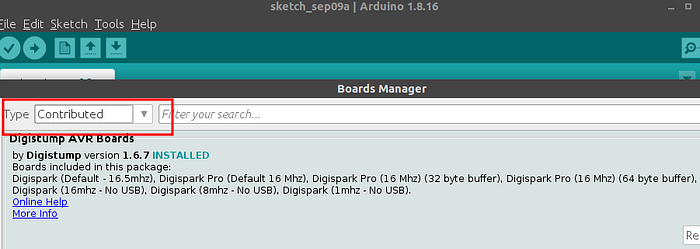
e. Select the “Digistump AVR Boards” package and click the “Install” button. (in my case it’s remove cause it’s already installed)
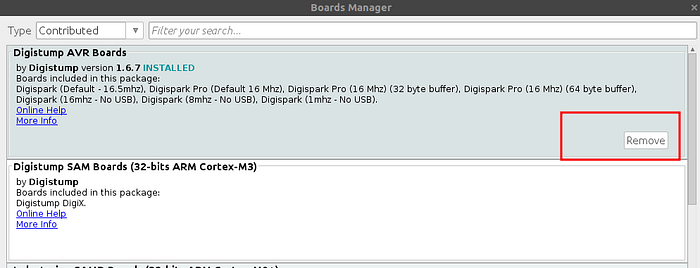
f. You’ll see the download progress on the bottom bar of the “Boards Manager” window, when complete it will show “Installed” next to that item on the list.
g. WINDOWS USERS: When complete the install with pop up a Driver Install Wizard window, please click “Next” on this Window to install the drivers for Digistump Boards (If you already have them installed, this installer will update them and install any that are missing)
h. With the install complete, close the “Boards Manager” window and select the Digispark from the Tools→Boards menu. “Digispark (Default — 16.5mhz)” is the board that should be selected by all new users.
Linux Users ensure that you the following udev rules place in /etc/udev/rules.d/49-micronucleus.rules
Reload rules using:
udevadm control --reload-rulesStep 5: Writing the code.
The code is in the arduino programming language.
complete code: https://gist.github.com/muokicaleb/f671c3627f39088691fbd385a7785688
Code breakdown:
#include "DigiKeyboard.h"
#define KEY_TAB 0x2B
#define KEY_ESCAPE 0x29
Line 1 is including the “DigiKeyboard.h” library which we will use to mimic a keyboard.
Line 2 and 3 are variables set to specific keyboard values.
void setup() {
DigiKeyboard.delay(1000); // 1s delay // open terminal DigiKeyboard.sendKeyStroke(KEY_T, MOD_ALT_RIGHT | MOD_CONTROL_LEFT); DigiKeyboard.delay(500);
DigiKeyboard.sendKeyStroke(KEY_ENTER); }
Line 6 is a 1 second delay. The main purpose of this is to give enough time for the target device to identify the new connected device before executing the code.
Line 8 is a keyboard shortcut to open a terminal.
Line 9 is a half second delay before pushing enter in line 10.
void phantomCode(String filename){
DigiKeyboard.println("vim " +filename);
DigiKeyboard.delay(1000);
DigiKeyboard.sendKeyStroke(KEY_ENTER);
DigiKeyboard.delay(1000);
DigiKeyboard.sendKeyStroke(KEY_I);
DigiKeyboard.delay(1000); // code
DigiKeyboard.println("# Lol"); DigiKeyboard.sendKeyStroke(KEY_ENTER);
DigiKeyboard.delay(1000);
// save
DigiKeyboard.sendKeyStroke(KEY_ESCAPE);
int randomWait = random(1000, 5000);
DigiKeyboard.delay(randomWait);
DigiKeyboard.println(":wq");
DigiKeyboard.sendKeyStroke(KEY_ENTER);
DigiKeyboard.delay(2000); }
The phantomCode function takes the filename as parameter. The filename has to include the file extension of the programming language you want to write in eg .py for python.
DigiKeyboard.println("vim " +filename);
DigiKeyboard.delay(1000);
DigiKeyboard.sendKeyStroke(KEY_ENTER);
DigiKeyboard.delay(1000);
DigiKeyboard.sendKeyStroke(KEY_I);
DigiKeyboard.delay(1000);
line 15–17 is opening a the file we had passed in function.
line 19 is entering insert mode.
// code
DigiKeyboard.println("# Lol"); DigiKeyboard.sendKeyStroke(KEY_ENTER);
DigiKeyboard.delay(1000);// save
DigiKeyboard.sendKeyStroke(KEY_ESCAPE);
int randomWait = random(1000, 5000);
DigiKeyboard.delay(randomWait);
DigiKeyboard.println(":wq");
DigiKeyboard.sendKeyStroke(KEY_ENTER);
DigiKeyboard.delay(2000);void loop() {
phantomCode("hello.py");
phantomCode("hello.lisp");
phantomCode("hello.asm");
phantomCode("hello.lhs");
phantomCode("hello.pro");
}
Step 6: Uploading the code on the digispark.
- click on the upload button then insert the digispark.
Step 7 : Testing.
After successfully uploading the code, insert the digispark into the target Linux pc. In my case I’m using a rasberry pi 4.
Conclusion.
- A lot more can be done with a digispark microcontroller board especially in cyber security and automation.
- The amount of time used in coding should not be used as a measure of productivity.
References.
- http://digistump.com/products/1
- https://www.electromaker.io/blog/article/introduction-to-the-attiny85-19#:~:text=The%20ATtiny85%20is%20a%20microcontroller,itself%20rather%20than%20the%20board.
- https://wakatime.com/about
- https://www.youtube.com/watch?v=rHpF2j6nmuw
- https://www.circuitbasics.com/arduino-basics-installing-software/
- http://digistump.com/wiki/digispark/tutorials/connecting
- https://github.com/micronucleus/micronucleus/wiki/Ubuntu-Linux
- http://digistump.com/wiki/digispark/tutorials/linuxtroubleshooting
- https://caron.ws/wp-content/uploads/telechargement/Programmation/hid.h
Originally published at https://www.linkedin.com.